Category Archives: Ukulele Education
Why isn’t this chord in my chord dictionary!?

I have a student that isn’t afraid to ask me questions, followed up with questions, sometimes followed up with questions. I thought our recent thread might be useful to some other players that were wondering, “Why isn’t this chord in my chord dictionary!?”
Student: “When I looked up the Bbadd9 chord, I didn’t see any variant that matched what I’d been playing. When I entered the notes I had been playing at Uke Buddy, it identified the chord as A#Madd9. Is that what you want us playing?”
Me: “Yeah, 3213 is a Bbadd9 or A#add9 … a BbMadd9 or A#Madd9 is just a lengthier way of saying the same thing.”‘
Student: “So why doesn’t 3213 show up when I search for the chord (either in my app or Uke Buddy)? Strange….”
LONG ANSWER
Because most chord libraries are not complete. Why incomplete? Because there are so many possible chords … any three or more separate notes can be combined to make up a chord, with 12 separate notes in standard Western music, that makes for 220 possible 3-note chords and 495 possible 4-note chords (ukulele can’t do 5-note chords with only 4 strings, but keyboard instruments can easily). That means there are 715 possible chords to play on the ukulele (not counting inversions). Not all of these are useful. Who decides which ones are useful? Whoever created the chord library. They are generally only going to include common chords and add9 chords aren’t as common. Why aren’t they as common? My theory is that it is because they don’t usually sound very good on guitar, so less songwriters use these chords (guitar being one of the predominant songwriting tools). But, add9 chords sound gorgeous on ukulele because of the ukulele’s reentrant tuning.
There’s a free Ukulele Magazine article on the ‘Don’t Lift a Finger’ set of chords by master ukulele player and teacher James Hill that makes a point of explaining Bbadd9 in relation to F and C.
To get more esoteric and useless, all of the following 3 and 4 note combinations (pasted below) are technically chords (though many of them might be described as discordant). Our chord naming system is based on major and minor third intervals, so naming some of these ‘chords’ with that system would become somewhat of a chore. For instance, the first set of notes could be described as Amaj7add9no3no5, which is pretty useless. Would you ever hear that three-note combination in music? Perhaps. It’s not impossible. Is it common enough to include in a chord dictionary? No, I think not.
However, for ukulele purposes, it wouldn’t hurt chord dictionary creators to include such a beautiful set as the add9 chords, despite being less common.
{A,Bb,B} {A,Bb,C} {A,Bb,Db} {A,Bb,D} {A,Bb,Eb} {A,Bb,E} {A,Bb,F} {A,Bb,F#} {A,Bb,G} {A,Bb,Ab} {A,B,C} {A,B,Db} {A,B,D} {A,B,Eb} {A,B,E} {A,B,F} {A,B,F#} {A,B,G} {A,B,Ab} {A,C,Db} {A,C,D} {A,C,Eb} {A,C,E} {A,C,F} {A,C,F#} {A,C,G} {A,C,Ab} {A,Db,D} {A,Db,Eb} {A,Db,E} {A,Db,F} {A,Db,F#} {A,Db,G} {A,Db,Ab} {A,D,Eb} {A,D,E} {A,D,F} {A,D,F#} {A,D,G} {A,D,Ab} {A,Eb,E} {A,Eb,F} {A,Eb,F#} {A,Eb,G} {A,Eb,Ab} {A,E,F} {A,E,F#} {A,E,G} {A,E,Ab} {A,F,F#} {A,F,G} {A,F,Ab} {A,F#,G} {A,F#,Ab} {A,G,Ab} {Bb,B,C} {Bb,B,Db} {Bb,B,D} {Bb,B,Eb} {Bb,B,E} {Bb,B,F} {Bb,B,F#} {Bb,B,G} {Bb,B,Ab} {Bb,C,Db} {Bb,C,D} {Bb,C,Eb} {Bb,C,E} {Bb,C,F} {Bb,C,F#} {Bb,C,G} {Bb,C,Ab} {Bb,Db,D} {Bb,Db,Eb} {Bb,Db,E} {Bb,Db,F} {Bb,Db,F#} {Bb,Db,G} {Bb,Db,Ab} {Bb,D,Eb} {Bb,D,E} {Bb,D,F} {Bb,D,F#} {Bb,D,G} {Bb,D,Ab} {Bb,Eb,E} {Bb,Eb,F} {Bb,Eb,F#} {Bb,Eb,G} {Bb,Eb,Ab} {Bb,E,F} {Bb,E,F#} {Bb,E,G} {Bb,E,Ab} {Bb,F,F#} {Bb,F,G} {Bb,F,Ab} {Bb,F#,G} {Bb,F#,Ab} {Bb,G,Ab} {B,C,Db} {B,C,D} {B,C,Eb} {B,C,E} {B,C,F} {B,C,F#} {B,C,G} {B,C,Ab} {B,Db,D} {B,Db,Eb} {B,Db,E} {B,Db,F} {B,Db,F#} {B,Db,G} {B,Db,Ab} {B,D,Eb} {B,D,E} {B,D,F} {B,D,F#} {B,D,G} {B,D,Ab} {B,Eb,E} {B,Eb,F} {B,Eb,F#} {B,Eb,G} {B,Eb,Ab} {B,E,F} {B,E,F#} {B,E,G} {B,E,Ab} {B,F,F#} {B,F,G} {B,F,Ab} {B,F#,G} {B,F#,Ab} {B,G,Ab} {C,Db,D} {C,Db,Eb} {C,Db,E} {C,Db,F} {C,Db,F#} {C,Db,G} {C,Db,Ab} {C,D,Eb} {C,D,E} {C,D,F} {C,D,F#} {C,D,G} {C,D,Ab} {C,Eb,E} {C,Eb,F} {C,Eb,F#} {C,Eb,G} {C,Eb,Ab} {C,E,F} {C,E,F#} {C,E,G} {C,E,Ab} {C,F,F#} {C,F,G} {C,F,Ab} {C,F#,G} {C,F#,Ab} {C,G,Ab} {Db,D,Eb} {Db,D,E} {Db,D,F} {Db,D,F#} {Db,D,G} {Db,D,Ab} {Db,Eb,E} {Db,Eb,F} {Db,Eb,F#} {Db,Eb,G} {Db,Eb,Ab} {Db,E,F} {Db,E,F#} {Db,E,G} {Db,E,Ab} {Db,F,F#} {Db,F,G} {Db,F,Ab} {Db,F#,G} {Db,F#,Ab} {Db,G,Ab} {D,Eb,E} {D,Eb,F} {D,Eb,F#} {D,Eb,G} {D,Eb,Ab} {D,E,F} {D,E,F#} {D,E,G} {D,E,Ab} {D,F,F#} {D,F,G} {D,F,Ab} {D,F#,G} {D,F#,Ab} {D,G,Ab} {Eb,E,F} {Eb,E,F#} {Eb,E,G} {Eb,E,Ab} {Eb,F,F#} {Eb,F,G} {Eb,F,Ab} {Eb,F#,G} {Eb,F#,Ab} {Eb,G,Ab} {E,F,F#} {E,F,G} {E,F,Ab} {E,F#,G} {E,F#,Ab} {E,G,Ab} {F,F#,G} {F,F#,Ab} {F,G,Ab} {F#,G,Ab} {A,Bb,B,C} {A,Bb,B,Db} {A,Bb,B,D} {A,Bb,B,Eb} {A,Bb,B,E} {A,Bb,B,F} {A,Bb,B,F#} {A,Bb,B,G} {A,Bb,B,Ab} {A,Bb,C,Db} {A,Bb,C,D} {A,Bb,C,Eb} {A,Bb,C,E} {A,Bb,C,F} {A,Bb,C,F#} {A,Bb,C,G} {A,Bb,C,Ab} {A,Bb,Db,D} {A,Bb,Db,Eb} {A,Bb,Db,E} {A,Bb,Db,F} {A,Bb,Db,F#} {A,Bb,Db,G} {A,Bb,Db,Ab} {A,Bb,D,Eb} {A,Bb,D,E} {A,Bb,D,F} {A,Bb,D,F#} {A,Bb,D,G} {A,Bb,D,Ab} {A,Bb,Eb,E} {A,Bb,Eb,F} {A,Bb,Eb,F#} {A,Bb,Eb,G} {A,Bb,Eb,Ab} {A,Bb,E,F} {A,Bb,E,F#} {A,Bb,E,G} {A,Bb,E,Ab} {A,Bb,F,F#} {A,Bb,F,G} {A,Bb,F,Ab} {A,Bb,F#,G} {A,Bb,F#,Ab} {A,Bb,G,Ab} {A,B,C,Db} {A,B,C,D} {A,B,C,Eb} {A,B,C,E} {A,B,C,F} {A,B,C,F#} {A,B,C,G} {A,B,C,Ab} {A,B,Db,D} {A,B,Db,Eb} {A,B,Db,E} {A,B,Db,F} {A,B,Db,F#} {A,B,Db,G} {A,B,Db,Ab} {A,B,D,Eb} {A,B,D,E} {A,B,D,F} {A,B,D,F#} {A,B,D,G} {A,B,D,Ab} {A,B,Eb,E} {A,B,Eb,F} {A,B,Eb,F#} {A,B,Eb,G} {A,B,Eb,Ab} {A,B,E,F} {A,B,E,F#} {A,B,E,G} {A,B,E,Ab} {A,B,F,F#} {A,B,F,G} {A,B,F,Ab} {A,B,F#,G} {A,B,F#,Ab} {A,B,G,Ab} {A,C,Db,D} {A,C,Db,Eb} {A,C,Db,E} {A,C,Db,F} {A,C,Db,F#} {A,C,Db,G} {A,C,Db,Ab} {A,C,D,Eb} {A,C,D,E} {A,C,D,F} {A,C,D,F#} {A,C,D,G} {A,C,D,Ab} {A,C,Eb,E} {A,C,Eb,F} {A,C,Eb,F#} {A,C,Eb,G} {A,C,Eb,Ab} {A,C,E,F} {A,C,E,F#} {A,C,E,G} {A,C,E,Ab} {A,C,F,F#} {A,C,F,G} {A,C,F,Ab} {A,C,F#,G} {A,C,F#,Ab} {A,C,G,Ab} {A,Db,D,Eb} {A,Db,D,E} {A,Db,D,F} {A,Db,D,F#} {A,Db,D,G} {A,Db,D,Ab} {A,Db,Eb,E} {A,Db,Eb,F} {A,Db,Eb,F#} {A,Db,Eb,G} {A,Db,Eb,Ab} {A,Db,E,F} {A,Db,E,F#} {A,Db,E,G} {A,Db,E,Ab} {A,Db,F,F#} {A,Db,F,G} {A,Db,F,Ab} {A,Db,F#,G} {A,Db,F#,Ab} {A,Db,G,Ab} {A,D,Eb,E} {A,D,Eb,F} {A,D,Eb,F#} {A,D,Eb,G} {A,D,Eb,Ab} {A,D,E,F} {A,D,E,F#} {A,D,E,G} {A,D,E,Ab} {A,D,F,F#} {A,D,F,G} {A,D,F,Ab} {A,D,F#,G} {A,D,F#,Ab} {A,D,G,Ab} {A,Eb,E,F} {A,Eb,E,F#} {A,Eb,E,G} {A,Eb,E,Ab} {A,Eb,F,F#} {A,Eb,F,G} {A,Eb,F,Ab} {A,Eb,F#,G} {A,Eb,F#,Ab} {A,Eb,G,Ab} {A,E,F,F#} {A,E,F,G} {A,E,F,Ab} {A,E,F#,G} {A,E,F#,Ab} {A,E,G,Ab} {A,F,F#,G} {A,F,F#,Ab} {A,F,G,Ab} {A,F#,G,Ab} {Bb,B,C,Db} {Bb,B,C,D} {Bb,B,C,Eb} {Bb,B,C,E} {Bb,B,C,F} {Bb,B,C,F#} {Bb,B,C,G} {Bb,B,C,Ab} {Bb,B,Db,D} {Bb,B,Db,Eb} {Bb,B,Db,E} {Bb,B,Db,F} {Bb,B,Db,F#} {Bb,B,Db,G} {Bb,B,Db,Ab} {Bb,B,D,Eb} {Bb,B,D,E} {Bb,B,D,F} {Bb,B,D,F#} {Bb,B,D,G} {Bb,B,D,Ab} {Bb,B,Eb,E} {Bb,B,Eb,F} {Bb,B,Eb,F#} {Bb,B,Eb,G} {Bb,B,Eb,Ab} {Bb,B,E,F} {Bb,B,E,F#} {Bb,B,E,G} {Bb,B,E,Ab} {Bb,B,F,F#} {Bb,B,F,G} {Bb,B,F,Ab} {Bb,B,F#,G} {Bb,B,F#,Ab} {Bb,B,G,Ab} {Bb,C,Db,D} {Bb,C,Db,Eb} {Bb,C,Db,E} {Bb,C,Db,F} {Bb,C,Db,F#} {Bb,C,Db,G} {Bb,C,Db,Ab} {Bb,C,D,Eb} {Bb,C,D,E} {Bb,C,D,F} {Bb,C,D,F#} {Bb,C,D,G} {Bb,C,D,Ab} {Bb,C,Eb,E} {Bb,C,Eb,F} {Bb,C,Eb,F#} {Bb,C,Eb,G} {Bb,C,Eb,Ab} {Bb,C,E,F} {Bb,C,E,F#} {Bb,C,E,G} {Bb,C,E,Ab} {Bb,C,F,F#} {Bb,C,F,G} {Bb,C,F,Ab} {Bb,C,F#,G} {Bb,C,F#,Ab} {Bb,C,G,Ab} {Bb,Db,D,Eb} {Bb,Db,D,E} {Bb,Db,D,F} {Bb,Db,D,F#} {Bb,Db,D,G} {Bb,Db,D,Ab} {Bb,Db,Eb,E} {Bb,Db,Eb,F} {Bb,Db,Eb,F#} {Bb,Db,Eb,G} {Bb,Db,Eb,Ab} {Bb,Db,E,F} {Bb,Db,E,F#} {Bb,Db,E,G} {Bb,Db,E,Ab} {Bb,Db,F,F#} {Bb,Db,F,G} {Bb,Db,F,Ab} {Bb,Db,F#,G} {Bb,Db,F#,Ab} {Bb,Db,G,Ab} {Bb,D,Eb,E} {Bb,D,Eb,F} {Bb,D,Eb,F#} {Bb,D,Eb,G} {Bb,D,Eb,Ab} {Bb,D,E,F} {Bb,D,E,F#} {Bb,D,E,G} {Bb,D,E,Ab} {Bb,D,F,F#} {Bb,D,F,G} {Bb,D,F,Ab} {Bb,D,F#,G} {Bb,D,F#,Ab} {Bb,D,G,Ab} {Bb,Eb,E,F} {Bb,Eb,E,F#} {Bb,Eb,E,G} {Bb,Eb,E,Ab} {Bb,Eb,F,F#} {Bb,Eb,F,G} {Bb,Eb,F,Ab} {Bb,Eb,F#,G} {Bb,Eb,F#,Ab} {Bb,Eb,G,Ab} {Bb,E,F,F#} {Bb,E,F,G} {Bb,E,F,Ab} {Bb,E,F#,G} {Bb,E,F#,Ab} {Bb,E,G,Ab} {Bb,F,F#,G} {Bb,F,F#,Ab} {Bb,F,G,Ab} {Bb,F#,G,Ab} {B,C,Db,D} {B,C,Db,Eb} {B,C,Db,E} {B,C,Db,F} {B,C,Db,F#} {B,C,Db,G} {B,C,Db,Ab} {B,C,D,Eb} {B,C,D,E} {B,C,D,F} {B,C,D,F#} {B,C,D,G} {B,C,D,Ab} {B,C,Eb,E} {B,C,Eb,F} {B,C,Eb,F#} {B,C,Eb,G} {B,C,Eb,Ab} {B,C,E,F} {B,C,E,F#} {B,C,E,G} {B,C,E,Ab} {B,C,F,F#} {B,C,F,G} {B,C,F,Ab} {B,C,F#,G} {B,C,F#,Ab} {B,C,G,Ab} {B,Db,D,Eb} {B,Db,D,E} {B,Db,D,F} {B,Db,D,F#} {B,Db,D,G} {B,Db,D,Ab} {B,Db,Eb,E} {B,Db,Eb,F} {B,Db,Eb,F#} {B,Db,Eb,G} {B,Db,Eb,Ab} {B,Db,E,F} {B,Db,E,F#} {B,Db,E,G} {B,Db,E,Ab} {B,Db,F,F#} {B,Db,F,G} {B,Db,F,Ab} {B,Db,F#,G} {B,Db,F#,Ab} {B,Db,G,Ab} {B,D,Eb,E} {B,D,Eb,F} {B,D,Eb,F#} {B,D,Eb,G} {B,D,Eb,Ab} {B,D,E,F} {B,D,E,F#} {B,D,E,G} {B,D,E,Ab} {B,D,F,F#} {B,D,F,G} {B,D,F,Ab} {B,D,F#,G} {B,D,F#,Ab} {B,D,G,Ab} {B,Eb,E,F} {B,Eb,E,F#} {B,Eb,E,G} {B,Eb,E,Ab} {B,Eb,F,F#} {B,Eb,F,G} {B,Eb,F,Ab} {B,Eb,F#,G} {B,Eb,F#,Ab} {B,Eb,G,Ab} {B,E,F,F#} {B,E,F,G} {B,E,F,Ab} {B,E,F#,G} {B,E,F#,Ab} {B,E,G,Ab} {B,F,F#,G} {B,F,F#,Ab} {B,F,G,Ab} {B,F#,G,Ab} {C,Db,D,Eb} {C,Db,D,E} {C,Db,D,F} {C,Db,D,F#} {C,Db,D,G} {C,Db,D,Ab} {C,Db,Eb,E} {C,Db,Eb,F} {C,Db,Eb,F#} {C,Db,Eb,G} {C,Db,Eb,Ab} {C,Db,E,F} {C,Db,E,F#} {C,Db,E,G} {C,Db,E,Ab} {C,Db,F,F#} {C,Db,F,G} {C,Db,F,Ab} {C,Db,F#,G} {C,Db,F#,Ab} {C,Db,G,Ab} {C,D,Eb,E} {C,D,Eb,F} {C,D,Eb,F#} {C,D,Eb,G} {C,D,Eb,Ab} {C,D,E,F} {C,D,E,F#} {C,D,E,G} {C,D,E,Ab} {C,D,F,F#} {C,D,F,G} {C,D,F,Ab} {C,D,F#,G} {C,D,F#,Ab} {C,D,G,Ab} {C,Eb,E,F} {C,Eb,E,F#} {C,Eb,E,G} {C,Eb,E,Ab} {C,Eb,F,F#} {C,Eb,F,G} {C,Eb,F,Ab} {C,Eb,F#,G} {C,Eb,F#,Ab} {C,Eb,G,Ab} {C,E,F,F#} {C,E,F,G} {C,E,F,Ab} {C,E,F#,G} {C,E,F#,Ab} {C,E,G,Ab} {C,F,F#,G} {C,F,F#,Ab} {C,F,G,Ab} {C,F#,G,Ab} {Db,D,Eb,E} {Db,D,Eb,F} {Db,D,Eb,F#} {Db,D,Eb,G} {Db,D,Eb,Ab} {Db,D,E,F} {Db,D,E,F#} {Db,D,E,G} {Db,D,E,Ab} {Db,D,F,F#} {Db,D,F,G} {Db,D,F,Ab} {Db,D,F#,G} {Db,D,F#,Ab} {Db,D,G,Ab} {Db,Eb,E,F} {Db,Eb,E,F#} {Db,Eb,E,G} {Db,Eb,E,Ab} {Db,Eb,F,F#} {Db,Eb,F,G} {Db,Eb,F,Ab} {Db,Eb,F#,G} {Db,Eb,F#,Ab} {Db,Eb,G,Ab} {Db,E,F,F#} {Db,E,F,G} {Db,E,F,Ab} {Db,E,F#,G} {Db,E,F#,Ab} {Db,E,G,Ab} {Db,F,F#,G} {Db,F,F#,Ab} {Db,F,G,Ab} {Db,F#,G,Ab} {D,Eb,E,F} {D,Eb,E,F#} {D,Eb,E,G} {D,Eb,E,Ab} {D,Eb,F,F#} {D,Eb,F,G} {D,Eb,F,Ab} {D,Eb,F#,G} {D,Eb,F#,Ab} {D,Eb,G,Ab} {D,E,F,F#} {D,E,F,G} {D,E,F,Ab} {D,E,F#,G} {D,E,F#,Ab} {D,E,G,Ab} {D,F,F#,G} {D,F,F#,Ab} {D,F,G,Ab} {D,F#,G,Ab} {Eb,E,F,F#} {Eb,E,F,G} {Eb,E,F,Ab} {Eb,E,F#,G} {Eb,E,F#,Ab} {Eb,E,G,Ab} {Eb,F,F#,G} {Eb,F,F#,Ab} {Eb,F,G,Ab} {Eb,F#,G,Ab} {E,F,F#,G} {E,F,F#,Ab} {E,F,G,Ab} {E,F#,G,Ab} {F,F#,G,Ab}
Making Ukulele Tabs with Musescore : Free Template
I recently started writing ukulele tablature in Musescore, not because I don’t love Finale (I’ve been using that as my main notation program since the late 90s and will still use it for publishing purposes), but because I wanted to see if it would be a good free option for my students to make their own sheet music who can’t afford Finale‘s somewhat hefty price tag. Bottom line, Musescore will make very nice looking tablature, but (like all software) comes with a somewhat frustrating learning curve that isn’t always intuitive. It’s not THAT painful though and you can’t beat the price (just your time to learn it). Download the free software at Musescore.org
If you’re interested in taking this learning leap and making your own ukulele sheet music in instrumental tablature, I’ve eased the process somewhat by creating a template to help you get started. You can download it here: Ukulele Tablature Template – Musescore File (Google Drive link).
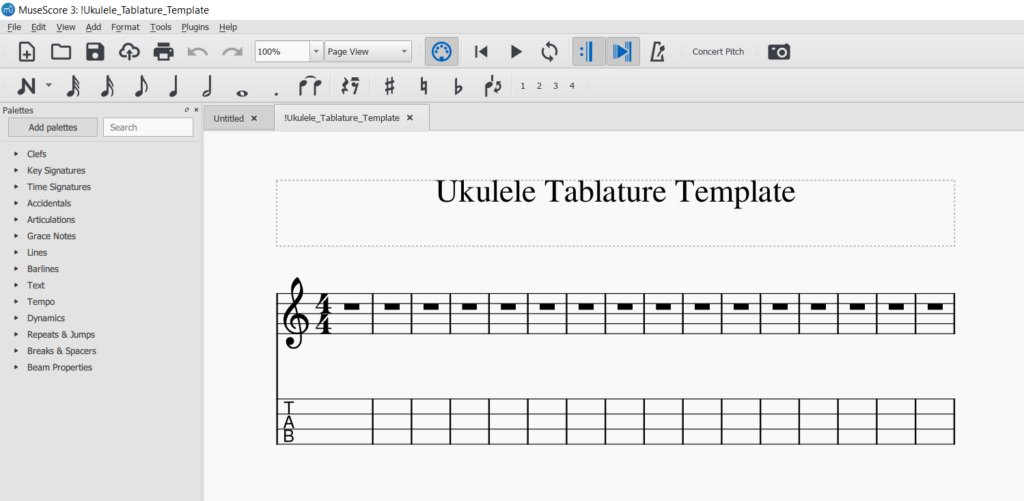
A few tips:
- Notes can be entered by selecting the note value and clicking on the score.
- Note values can also be selected with the number pad on your keyboard (5 = a quarter note, 4= an eighth note, etc.).
- Once a note value is selected you can enter notes with a midi keyboard if you have one connected to your computer. I use a Korg Microkey, with my laptop so I can write anywhere, but any midi keyboard will work.
- You can edit fret numbers on the tablature by deselecting note entry, clicking on a number and then using up/down keys to change the number (if you’re getting a sharp showing up when you want a flat in the staff, go above the note and then back down to switch the accidental).
- Musescore has a reference page on tablature if you have other questions.
- Getting around in the program takes some learning and google searches, but once you get a few tricks down and get your first score finished you can go to ‘file,’ hit ‘export’ and turn out a pdf you can print or share with the world.
Instrumental & Soloing Tips from the Ukulele Community
 I’m a pretty good ‘rhythm’ ukulele player … meaning I have a strong set of strumming and fingerpicking skills to lay down an accompaniment for my singing. I’m an O.K. ukulele instrumentalist … meaning I stay ahead of all my students in the Ukulele Youth Choir I direct and most of the members in my group, the Happy Valley Ukes. There are about three members of that latter group that really push me and make me want to be a better player. So, I’m planning on diving into some intense daily playing again.
I’m no stranger to practice routines, and I’ve written some practice advice for rhythm playing and self-accompaniment. Lately, I’ve been rehearsing some piano pieces that I plan to do in a concert soon and have picked up some more tips there that I think might transfer well over to ukulele (subject of a future post).
Anyway, I thought it would be a good idea to poll the collective wisdom of the ukulele community, via some Facebook groups, for their tips as well. Some of the ideas parallel things I probably would have said on my own, but there are other things in there I probably wouldn’t have thought about or considered. So here is some collective wisdom (though on some of these I couldn’t quite tell if they were serious, or poking fun at me for even asking: I’ll let you decide which ones are useful to you) . . .
- My tip is simply, repetition repetition repetition is the only way to improve and master any musical instrument. – Michael Nordahl Wallem
- To wit: Solo is best practiced ALONE! – Daniel Wesley
- Always practice with a metronome! Start very slowly and pick up the tempo as your accuracy improves. – Craig W Hurst
- Use iReal, BandInABox or a reasonable backing track software to practice soloing. – Tom Towle
- Learn to read music, both in jazz charts AND ukulele tablature…learn lyrics so you can ‘sing’ the melody in your head well enough to be able to contrive variations to it over the harmony. -Tom Towle
- Learn and practice scales in all keys … major, natural and harmonic minors, dominant, blues and whole tone half tone. Learn the importance of the root note and where to find it. And practice as many hours a day as possible. For a start. – Nick Bennett
- Study the blues….be able to play the blues at any point in an improvised line.
Listen to the incredible Benny Chong constantly and tastefully play blues riffs throughout The Nearness of You. – Tom Towle - Learn to read music, both in jazz charts AND ukulele tablature…learn lyrics so you can ‘sing’ the melody in your head well enough to be able to contrive variations to it over the harmony. – Tom Towle
- Little and often to get fingertips hardened. Use a metronome and tap foot in time with it to get accurate timing. – Colin Lamb
- When I am soloing or leading I personally use a pick. It helps to practice to backing tracks. -Scott VanderStouw
- Learn things in pieces and start slow. – Reham Kcirtap
- If you mean single note soloing and improvisation: Learn about chord tones, not just scales. Develop vocabulary, small licks that then can be connected, varied, developed, etc. See D Minor Pentatonic Scale Uke Tutorial. -Jeff Weinberger
- Tom Towle also provided a link to a tutorial where he works through a solo in Uke Go to My Head, demonstrating the process he goes through to take a fairly-sophisticated jazz tune from scratch to something cool.
- Learn the most difficult parts of the song first. In very challenging songs this helps to ensure that you learn the whole song. – Jon Kent Clayburn
- LISTEN! Listen to the songs you want to play, to the melodies until you know them inside out, until you can hum the melodies when someone wakes you up at night. Learn by EAR, not by tabs or notes. Follow the chords to find the melodies. Be courageous enough to improvise. Never try to replicate anything 1:1 (it‘s been done already, so why do it again?). Give the tunes/melodies you play something of your personality. But again, most important: forget about tabs and notes and LISTEN, and learn by ear. – Martin Neuhold
- Chord melodies are where it’s at! Before attempting something more complex, learn the inversions for a simple three chord song thoroughly. Remember to adjust the key of the song to fit in the range of the ukulele. Then, use the notes of the melody to build inversions. Finding the perfect chord to fit the mood of the song (and one that you can actually play) is the mark of mastery. You may not have to play every string every time. You may run out of room as you climb up or down the neck, so get creative! Study Roy Smeck, Del Rey, Herb Ohta, and Lyle Ritz, and practice! – Donald Whitley
- I have found that when playing solo, I might follow the chords, but try and pick the melody instead of strumming. It works beautifully with Aloha Oe and Silent Night. – Bob Carmichael, Temecula Valley Ukulele Strummers
- Little and often, as the actress said to the bishop. – Ernie Halls
- Learn the correct/efficient fingering. – Midori OnQuest
- Don’t let your practice be strictly off paper. Put on a background track, and play accompaniment to it. They come in all keys. – Jól Retzloff
Now some of this applies more to improvisation, and some to learning a written solo … there’s a lot of good food for thought on both fronts. A number of people mentioned practicing to backing tracks, which is a great idea. I’ve been a composer for a long time, and remember when Band in a Box first came out … it was a complete joke, but looking at the current version I was amazed at the quality of the sounds coming out of the program … something new has made it into my wish list. Anyway, there are enough ideas here to keep me busy for several years, so thanks to all who contributed their thoughts.
Important Parts of the Ukulele (a Beginner’s Guide)
A beginner’s intro to the parts of the ukulele … body, lower & upper bouts, neck, head stock, tuners, strings, fret wires, fret numbers, fret markers, saddle, bridge, and, not to be left out, finger numbers. Also some tips about string stretch, dressing your frets and adjusting the nut and saddle.
Power Up Ukulele

Photo: Kirt Edblom
Some years ago I had this idea to create a step by step ukulele course around a game dynamic … Power Up Ukulele. I got it outlined as a site and added lots of ideas and material, but I never felt like I was finished with it, so I only shared it with a few students on a case by case basis. However, the site does contain a lot of information you might find useful, including paths for increasing your skills in:
- Chords
- Strumming
- Fingerstyle
- Soloing (Scales)
- Instrumental (Tablature)
Something I am particularly proud of is a Strum Shorthand system I came up with for writing down strumming patterns that were more complex than ‘down, down up, up, down up’ using a number of odd characters that are readily available in the most common font typefaces.
Anyway, I chose recently to make all the materials public with the hope that they might inspire some to ‘power up’ their playing. Enjoy!
The Mystery of the Nut
![]() For years, as I’ve taught hundreds of beginning students the various parts of the ukulele on their first day, I’ve speculated on why the nut on the ukulele is called a ‘nut.’ If you’re unfamiliar with the term, the ‘nut’ is the piece of bone (or dense plastic) near the head stock that has grooves cut in it in which the strings rest before traveling up the neck, over the saddle and attaching to the bridge.
For years, as I’ve taught hundreds of beginning students the various parts of the ukulele on their first day, I’ve speculated on why the nut on the ukulele is called a ‘nut.’ If you’re unfamiliar with the term, the ‘nut’ is the piece of bone (or dense plastic) near the head stock that has grooves cut in it in which the strings rest before traveling up the neck, over the saddle and attaching to the bridge.
Nut? Why nut? When talking to my students, my speculation always runs something like this: “I have no idea why this piece is called a nut. Maybe someone took a nut one day, cut a groove in it and stretched a string through the groove to make a simple string instrument.” It would work, and you could slide the nut to different positions to change the pitch, but is this the origin of the term? Who knows.
Wikipedia states, “The word may have come from the German Nut (pronounced “noot”), meaning groove or slot. The nut, however, is called a de:Sattel (“saddle”; also Obersattel) in German, whereas the part of a guitar known as the saddle in English, the surface of the bridge on which the strings rest, is called a de:Stegeinlage or Steg, in German.”
According to this, the origin may have been German, but the Germans call it something else? Hmm. Sounds like a stretch to me. So, I guess I’ll go on speculating with my students about notches cut in nuts. Maybe some day I’ll grab a nice hazelnut and cut my own notch and make a simple canjo or something. 🙂
Learn Hawaiian for Free
 For our Summer session of the Happy Valley Ukes we tackled music about islands, bays and beaches. We did four songs from Hawaii, two of which were in Hawaiian and one mele hapa haole (a song half Hawaiian, half English) … Aue Ke Aloha E, Nu’a O Ka Palai, Aloha ‘Oe and Pearly Shells (the C&H song).
I have a free Duolingo account, and was scrolling down to see which languages they had available … I started with Spanish, but now am learning French, German, Italian (singing languages I started at university) and HAWAIIAN! Yes, they have a free Hawaiian course. I was so surprised.
I’m still in the ‘basics’ section, but it is a lot of fun to start piecing together the syntax of what I’ve been singing without really knowing what I’ve been singing (something you can get used to when singing a lot of different languages, but would of course be better with real understanding).
Although the ukulele is not technically a Hawaiian instrument (it migrated there from Madeira), it does have a really strong connection with Hawaii and they can take credit for making the instrument famous … just thought I’d share this free way to expand your appreciation of Hawaiian songs, language (which is beautiful) and culture. You can sign up for free at Duolingo.
If you’re interested in learning the Hawaiian songs I mentioned above: All our Summer rehearsal sessions are available to watch at our Patreon page: Happy Valley Ukes (just make a pledge to support the project at the four dollar Strummer’s level for instant access). Other songs we learned in this session include four Irish tunes in tablature, Jamaica Farewell, Day-O, Moonlight Bay, By the Beautiful Sea, and Surfin’ USA.
The 3 Streams : Advice on Practicing to Put them All Together
 I was recently asked about singing, strumming and fingerpicking all at the same time by someone who attended the festival I organize each year. She wrote, “I am having a terrible time with this issue of singing and playing and wondered if you can give me any direction…?”
As far as singing and playing together goes, I do have some practice advice that I often share with my students. Chords, Strumming/Fingerpicking, and Vocals are 3 different streams of information. Just like a pianist practices the left hand and the right hand separately before putting them together, for best results we should plan to practice these 3 streams separately before trying to bring them together.
- Learn the song … not the chords, or how to play it … just listen to it. Or, if you read music, pluck out the melody. Once you feel you really know the song and can sing it confidently, you’re ready to start practicing your accompaniment.
- Scan through the song you are practicing and look for any chord combinations that you’ve never seen before. Any two chords that you’ve never seen side by side before ought to be practiced as a chord pair; go gently back and forth between these chords until you feel absolutely comfortable with the transition. Repeat this process for all new chord combinations. This is practice that is best done watching a documentary you enjoy (something that keeps your conscious mind engaged, but doesn’t prove too distracting to keep you from going back and forth, back and forth).
- Play through all the chords in order. This is not the time for any fancy strumming, just strum across each chord with a simple thumb strum. If there are any spots where you feel uncomfortable, go back to step 2 and practice those chord pairs.
- Once you’re sure you’re comfortable with all the chord changes you can start singing and strumming the chords. Once again, this is not the time for any fancy strumming or fingerpicking, just get those chords in the right places with your voice. This is a good time to break out a metronome to keep you accurate and honest. Practice slowly at first, a tempo where you can get everything right. Then, slowly increase your speed until you get it to the tempo you want.
- Fancy strums and fingerpicking techniques are icing on the cake. The cake will still be tasty without them. If you’re wanting frosting, it must be mixed separately and not baked with the cake. Strumming and fingerpicking should be practiced separately, without worrying about chords, melody or words. Again, this practice is best done with some kind of low-key television program running, because it is repetitive and dull and none of us really want to do it. We want to put it all together, now. Be patient. Practice the technique until you can do it and carry on a conversation at the same time. Go slow. Slow practice = fast progress.
- Once you’re absolutely sure your strumming and fingerpicking techniques are committed to your muscle memory and occupy not one wit your conscious effort, it is now time to try and put all 3 streams together. Once again, go super slow and work for accuracy, not speed. 10-20 slow passes through a song will be worth HUNDREDS of fast passes filled with errors. Time is on your side … don’t be in a rush … let it seep in deep.
- If you care to at this point, you can add decorations to your cake. These include things known as ‘intros’ ‘interludes’ ‘instrumentals’ and ‘fills’ where you can show off and add a professional touch. Honestly, I do not do this with the majority of my songs, because singing is my first love and I learned to play the uke to support my voice, not the other way around. But, some people, like James Hill, pull this off magnificently and are worth listening to for ideas.
If you’re interested in learning more about strumming, fingerpicking and soloing techniques, I put together a free website that covers a lot of material at http://powerup.ukuleleplay.com/ and if you’re looking to learn a bunch of cool songs with these principles applied, you can rehearse along with my group, The Happy Valley Ukes, from anywhere in the world by visiting our Patreon project at https://www.patreon.com/uke and pledging at the $4 a month level for full access to rehearsal videos and links to music.
Finally! New Music for Ukulele Ensembles
I’ve been stockpiling (quite unintentionally) a number of new arrangements for ukulele ensemble … I get them written for my group, The Happy Valley Ukes, and then never get around to posting them on the website. I can only plead the warcry of our day, “I’m so busy!” Anyway, here they are (links to Sheet Music Plus):
- Best Day of My Life (American Authors)
- Hard TImes Come Again No More (Stephen Foster)
- Hawaii Five-O Theme (The Ventures)
- I’d Like to Teach the World to Sing (in perfect harmony)
- You’re a Grand Old Flag (George M. Cohan)
Find these and more arrangements on the For Ukulele Ensembles page of this site.
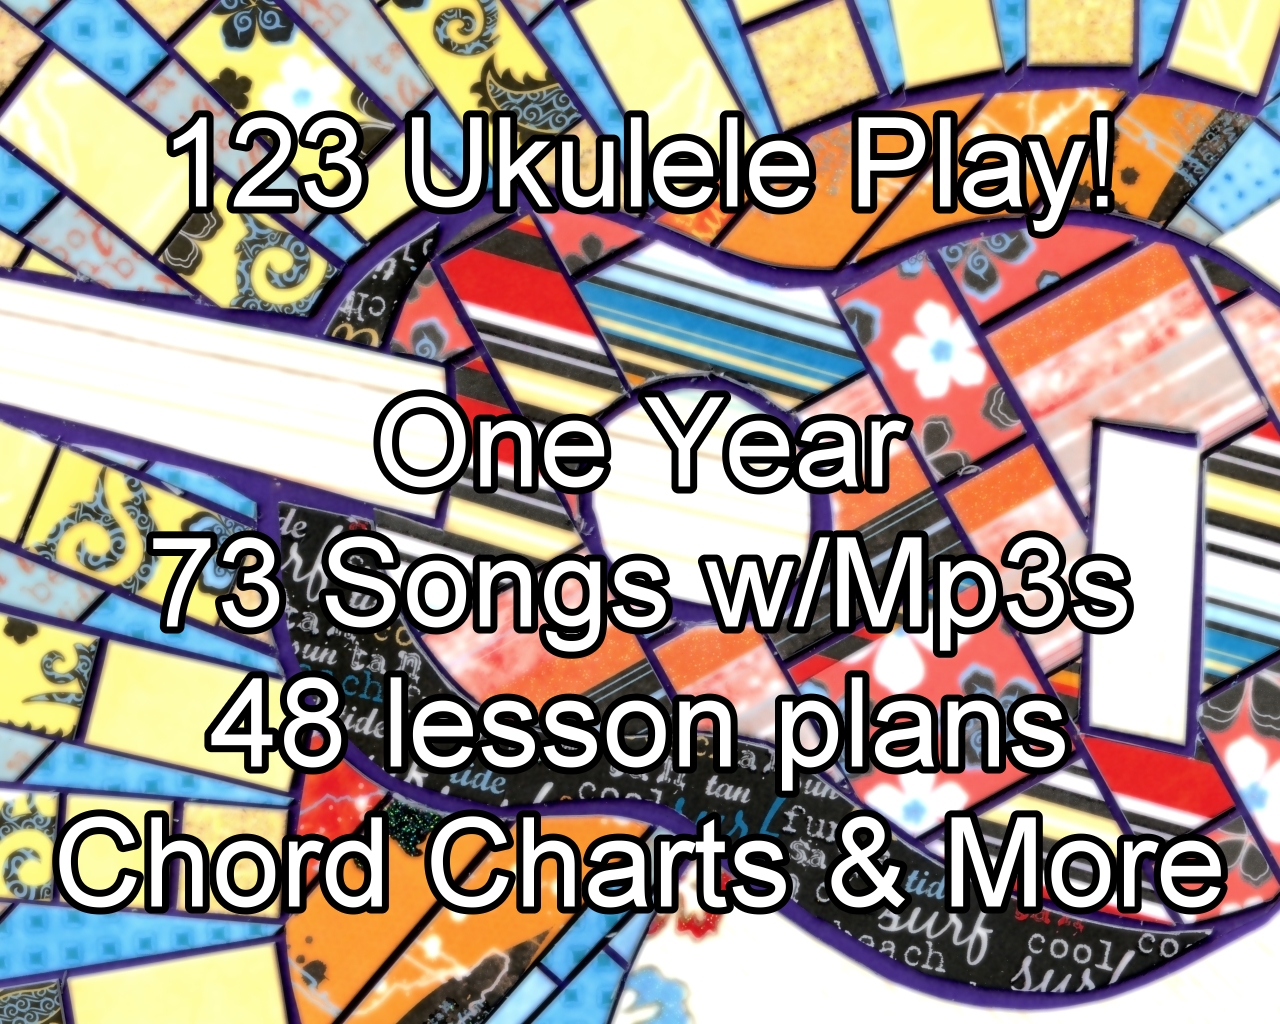
Review of 123 Ukulele Play! a one-year curriculum for schools
NEW! 123 Ukulele Play! : a curriculum for ukulele in the classroom
also on Teachers Pay Teachers and on Amazon. Find AUDIO here.
Review by Karin Kott
Full disclosure: I received this curriculum for free to review. I am starting a ukulele club in my middle school and this curriculum will be one of my resources.
This curriculum is a great resource for teachers. Intended to be used at the elementary school level, it is jam packed with information. One thing that I particularly appreciated was Mr. Taylor’s inclusion of interesting historical tidbits to give context to the songs.
At first glance, it seems as though quite a few concepts are introduced all at once: strumming, rhythm and note reading, chord diagrams, basic music theory, to name a few. Reading through it again, it becomes plain that Mr. Taylor has actually built in a great deal of flexibility into his curriculum.
For instance, the introductory songs are short, which is good—having the students learn short songs sets attainable goals, and therefore gives students a sense of rapid progression and accomplishment; second, this allows the teacher to revisit the song at different levels (once the melody or chords for the song are learned, the students can then revisit it but with specific strums, etc). This structure allows the teacher the opportunity to layer (scaffold) concepts on a familiar song while encouraging mastery.
Of course, as the curriculum progresses, the song selection becomes more diverse, the songs longer and more challenging, with more complex meters and rhythms, with more challenging techniques, including (but not limited to) IUC, Island, chunk/chnk strumming, and even some finger picking.
If you are thinking about starting up a uke program, I’d recommend checking out this curriculum.
A one-year Curriculum for Teaching beginning Ukulele in the Classroom
 NEW! 123 Ukulele Play! : a curriculum for ukulele in the classroom
also on Teachers Pay Teachers and on Amazon. Find AUDIO here.
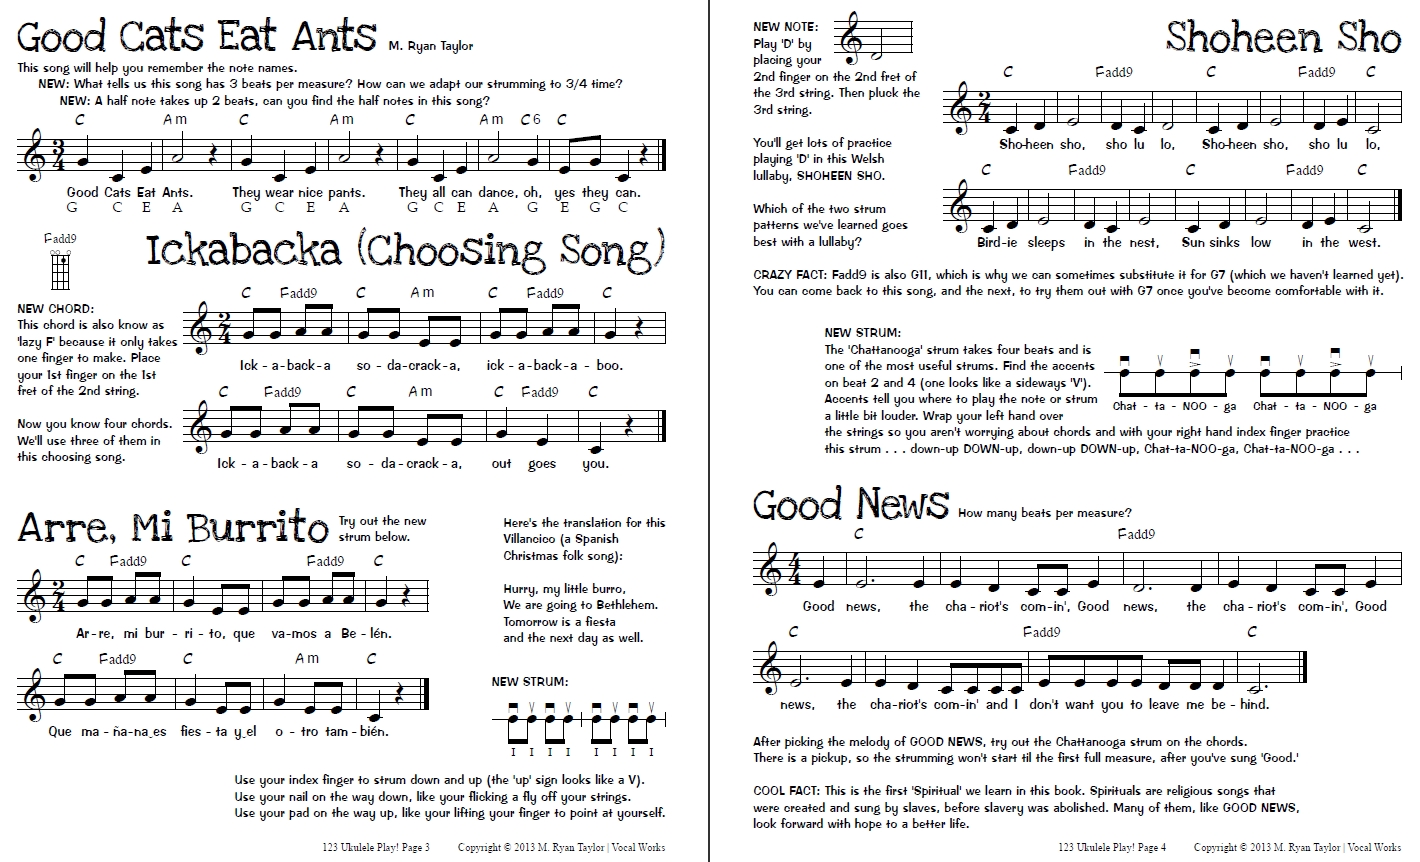
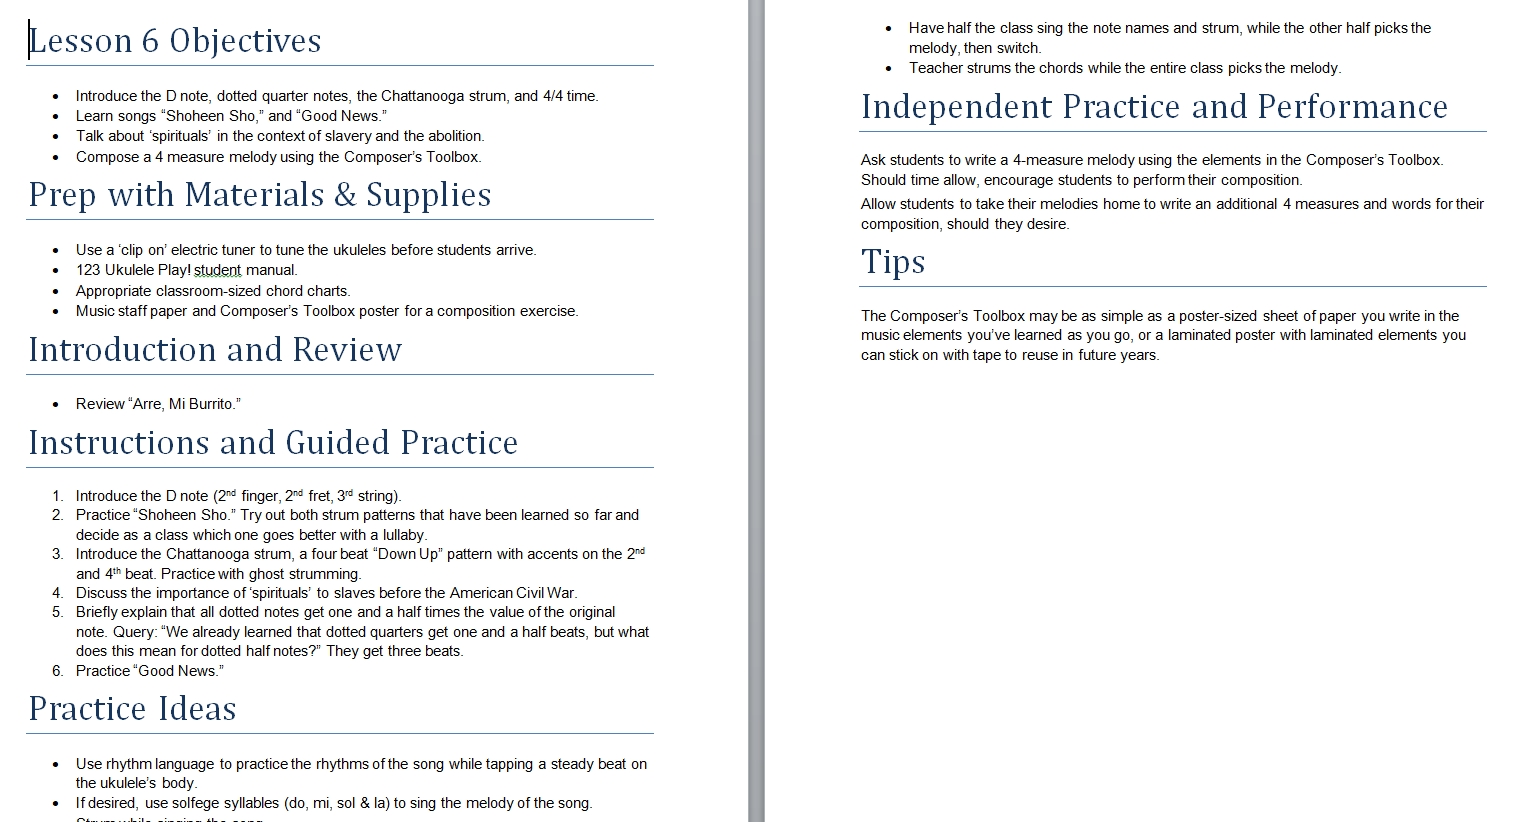
123 Ukulele Play! offers a step-by-step learning program for ukulele using developmental principles one might find in a Kodaly-based program, only with ukulele as a springboard for student enthusiasm. 73 songs are included in the student manual along with 48 lesson plans to help guide you through the process of teaching them. Also included are individual MP3 files for each of the songs, chord charts for the students as well as large chord charts to print and hang up on the walls.
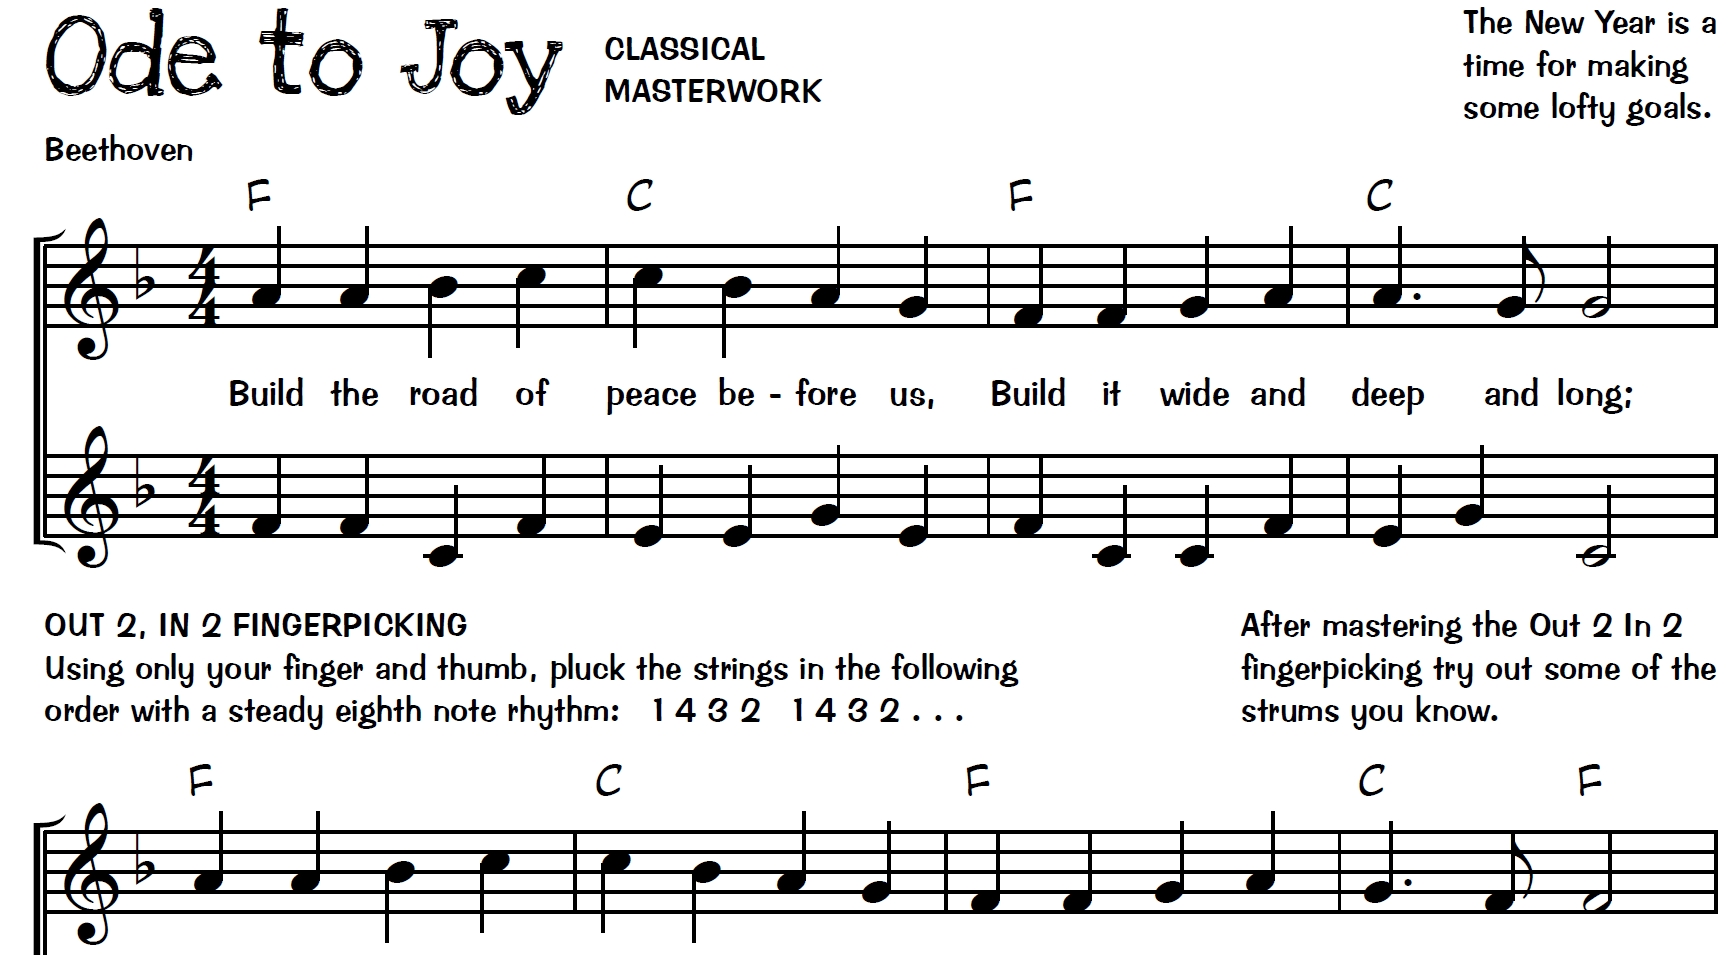
 After the basics and Christmas units (secular alternates are included for any religious songs), classical masterworks are interspersed with units on New Years Goals, Americana (for President’s Day), Irish Dance and finally a trip around the world to various island nations (Japan, Tonga, Australia), ending with Hawaiian songs as a nod to the instrument’s birthplace.
 About the author: M. Ryan Taylor is the author of a number of ukulele books aimed at beginning players, including Two Chord Camp Songs for Ukulele, The Two Chord Companion, Two Chord Christmas Songs, Christmas on 34th Street and more that you can find on UkulelePlay.com. He is a Kodaly-certified developmental education specialist and has worked with elementary-age children as the director of the American Fork Children’s Choir since 2010. He also directs the Happy Valley Ukes, an adult community ukulele orchestra, and organizes The Original Utah Uke Fest, a full day of free concerts, open mics, workshops and more that promotes the guitar’s tiny cousin. Taylor also travels to teach Ukulele Bootcamps wherever the wind might blow him. Catch him singing at https://www.facebook.com/uke.n.me/ or http://ukuleleplay.com/uke-and-me/ or even https://www.youtube.com/watch?v=FI-yslLxG-k&list=PLr6L7Q-AOghUzk4-VnmQku_-UISAgSfXO