
Category Archives: Ukulele Technique
The Apple Tree Wassail : 2-Chord Carols
What I Love About this Carol
Quite simply, I love the joyous ridiculousness of this wassail tune … the very thought of walking out to your apple trees in the middle of winter, spreading some good cider on their roots, and singing a boisterous song to them (all to bring in a bountiful harvest the next season) puts a bemused smirk on my face and cheers my heart. You don’t have to have apple trees to enjoy a sip of homemade wassail and singing with friends.
Find performances & tutorials for all 34 songs in the 2-Chord Christmas Songbook (tutorials cover song melodies, lyrics, transposition, chords, strumming and fingerpicking) at https://www.youtube.com/playlist?list=PLa626nR993OyV00-C0Yl23SnpLlZce8Wk … get printed copies of the book from https://amzn.to/2qWY42H … free pdf of the book for members at https://www.patreon.com/uke
Instrumental & Soloing Tips from the Ukulele Community
 I’m a pretty good ‘rhythm’ ukulele player … meaning I have a strong set of strumming and fingerpicking skills to lay down an accompaniment for my singing. I’m an O.K. ukulele instrumentalist … meaning I stay ahead of all my students in the Ukulele Youth Choir I direct and most of the members in my group, the Happy Valley Ukes. There are about three members of that latter group that really push me and make me want to be a better player. So, I’m planning on diving into some intense daily playing again.
I’m no stranger to practice routines, and I’ve written some practice advice for rhythm playing and self-accompaniment. Lately, I’ve been rehearsing some piano pieces that I plan to do in a concert soon and have picked up some more tips there that I think might transfer well over to ukulele (subject of a future post).
Anyway, I thought it would be a good idea to poll the collective wisdom of the ukulele community, via some Facebook groups, for their tips as well. Some of the ideas parallel things I probably would have said on my own, but there are other things in there I probably wouldn’t have thought about or considered. So here is some collective wisdom (though on some of these I couldn’t quite tell if they were serious, or poking fun at me for even asking: I’ll let you decide which ones are useful to you) . . .
- My tip is simply, repetition repetition repetition is the only way to improve and master any musical instrument. – Michael Nordahl Wallem
- To wit: Solo is best practiced ALONE! – Daniel Wesley
- Always practice with a metronome! Start very slowly and pick up the tempo as your accuracy improves. – Craig W Hurst
- Use iReal, BandInABox or a reasonable backing track software to practice soloing. – Tom Towle
- Learn to read music, both in jazz charts AND ukulele tablature…learn lyrics so you can ‘sing’ the melody in your head well enough to be able to contrive variations to it over the harmony. -Tom Towle
- Learn and practice scales in all keys … major, natural and harmonic minors, dominant, blues and whole tone half tone. Learn the importance of the root note and where to find it. And practice as many hours a day as possible. For a start. – Nick Bennett
- Study the blues….be able to play the blues at any point in an improvised line.
Listen to the incredible Benny Chong constantly and tastefully play blues riffs throughout The Nearness of You. – Tom Towle - Learn to read music, both in jazz charts AND ukulele tablature…learn lyrics so you can ‘sing’ the melody in your head well enough to be able to contrive variations to it over the harmony. – Tom Towle
- Little and often to get fingertips hardened. Use a metronome and tap foot in time with it to get accurate timing. – Colin Lamb
- When I am soloing or leading I personally use a pick. It helps to practice to backing tracks. -Scott VanderStouw
- Learn things in pieces and start slow. – Reham Kcirtap
- If you mean single note soloing and improvisation: Learn about chord tones, not just scales. Develop vocabulary, small licks that then can be connected, varied, developed, etc. See D Minor Pentatonic Scale Uke Tutorial. -Jeff Weinberger
- Tom Towle also provided a link to a tutorial where he works through a solo in Uke Go to My Head, demonstrating the process he goes through to take a fairly-sophisticated jazz tune from scratch to something cool.
- Learn the most difficult parts of the song first. In very challenging songs this helps to ensure that you learn the whole song. – Jon Kent Clayburn
- LISTEN! Listen to the songs you want to play, to the melodies until you know them inside out, until you can hum the melodies when someone wakes you up at night. Learn by EAR, not by tabs or notes. Follow the chords to find the melodies. Be courageous enough to improvise. Never try to replicate anything 1:1 (it‘s been done already, so why do it again?). Give the tunes/melodies you play something of your personality. But again, most important: forget about tabs and notes and LISTEN, and learn by ear. – Martin Neuhold
- Chord melodies are where it’s at! Before attempting something more complex, learn the inversions for a simple three chord song thoroughly. Remember to adjust the key of the song to fit in the range of the ukulele. Then, use the notes of the melody to build inversions. Finding the perfect chord to fit the mood of the song (and one that you can actually play) is the mark of mastery. You may not have to play every string every time. You may run out of room as you climb up or down the neck, so get creative! Study Roy Smeck, Del Rey, Herb Ohta, and Lyle Ritz, and practice! – Donald Whitley
- I have found that when playing solo, I might follow the chords, but try and pick the melody instead of strumming. It works beautifully with Aloha Oe and Silent Night. – Bob Carmichael, Temecula Valley Ukulele Strummers
- Little and often, as the actress said to the bishop. – Ernie Halls
- Learn the correct/efficient fingering. – Midori OnQuest
- Don’t let your practice be strictly off paper. Put on a background track, and play accompaniment to it. They come in all keys. – Jól Retzloff
Now some of this applies more to improvisation, and some to learning a written solo … there’s a lot of good food for thought on both fronts. A number of people mentioned practicing to backing tracks, which is a great idea. I’ve been a composer for a long time, and remember when Band in a Box first came out … it was a complete joke, but looking at the current version I was amazed at the quality of the sounds coming out of the program … something new has made it into my wish list. Anyway, there are enough ideas here to keep me busy for several years, so thanks to all who contributed their thoughts.
Power Up Ukulele

Photo: Kirt Edblom
Some years ago I had this idea to create a step by step ukulele course around a game dynamic … Power Up Ukulele. I got it outlined as a site and added lots of ideas and material, but I never felt like I was finished with it, so I only shared it with a few students on a case by case basis. However, the site does contain a lot of information you might find useful, including paths for increasing your skills in:
- Chords
- Strumming
- Fingerstyle
- Soloing (Scales)
- Instrumental (Tablature)
Something I am particularly proud of is a Strum Shorthand system I came up with for writing down strumming patterns that were more complex than ‘down, down up, up, down up’ using a number of odd characters that are readily available in the most common font typefaces.
Anyway, I chose recently to make all the materials public with the hope that they might inspire some to ‘power up’ their playing. Enjoy!
The 3 Streams : Advice on Practicing to Put them All Together
 I was recently asked about singing, strumming and fingerpicking all at the same time by someone who attended the festival I organize each year. She wrote, “I am having a terrible time with this issue of singing and playing and wondered if you can give me any direction…?”
As far as singing and playing together goes, I do have some practice advice that I often share with my students. Chords, Strumming/Fingerpicking, and Vocals are 3 different streams of information. Just like a pianist practices the left hand and the right hand separately before putting them together, for best results we should plan to practice these 3 streams separately before trying to bring them together.
- Learn the song … not the chords, or how to play it … just listen to it. Or, if you read music, pluck out the melody. Once you feel you really know the song and can sing it confidently, you’re ready to start practicing your accompaniment.
- Scan through the song you are practicing and look for any chord combinations that you’ve never seen before. Any two chords that you’ve never seen side by side before ought to be practiced as a chord pair; go gently back and forth between these chords until you feel absolutely comfortable with the transition. Repeat this process for all new chord combinations. This is practice that is best done watching a documentary you enjoy (something that keeps your conscious mind engaged, but doesn’t prove too distracting to keep you from going back and forth, back and forth).
- Play through all the chords in order. This is not the time for any fancy strumming, just strum across each chord with a simple thumb strum. If there are any spots where you feel uncomfortable, go back to step 2 and practice those chord pairs.
- Once you’re sure you’re comfortable with all the chord changes you can start singing and strumming the chords. Once again, this is not the time for any fancy strumming or fingerpicking, just get those chords in the right places with your voice. This is a good time to break out a metronome to keep you accurate and honest. Practice slowly at first, a tempo where you can get everything right. Then, slowly increase your speed until you get it to the tempo you want.
- Fancy strums and fingerpicking techniques are icing on the cake. The cake will still be tasty without them. If you’re wanting frosting, it must be mixed separately and not baked with the cake. Strumming and fingerpicking should be practiced separately, without worrying about chords, melody or words. Again, this practice is best done with some kind of low-key television program running, because it is repetitive and dull and none of us really want to do it. We want to put it all together, now. Be patient. Practice the technique until you can do it and carry on a conversation at the same time. Go slow. Slow practice = fast progress.
- Once you’re absolutely sure your strumming and fingerpicking techniques are committed to your muscle memory and occupy not one wit your conscious effort, it is now time to try and put all 3 streams together. Once again, go super slow and work for accuracy, not speed. 10-20 slow passes through a song will be worth HUNDREDS of fast passes filled with errors. Time is on your side … don’t be in a rush … let it seep in deep.
- If you care to at this point, you can add decorations to your cake. These include things known as ‘intros’ ‘interludes’ ‘instrumentals’ and ‘fills’ where you can show off and add a professional touch. Honestly, I do not do this with the majority of my songs, because singing is my first love and I learned to play the uke to support my voice, not the other way around. But, some people, like James Hill, pull this off magnificently and are worth listening to for ideas.
If you’re interested in learning more about strumming, fingerpicking and soloing techniques, I put together a free website that covers a lot of material at http://powerup.ukuleleplay.com/ and if you’re looking to learn a bunch of cool songs with these principles applied, you can rehearse along with my group, The Happy Valley Ukes, from anywhere in the world by visiting our Patreon project at https://www.patreon.com/uke and pledging at the $4 a month level for full access to rehearsal videos and links to music.
The Beauties of a Lyric Sheet w/Chords : Ex. What a Wonderful World
As someone that grew up in a very ‘classical’ family (meaning my dad was a band director and we had lots of traditional sheet music available to us all the time, piano lessons from an early age and the expectation that we would choose an additional instrument well before entering high school), winning me over to the beauties of a simple lyric sheet with chords took quite a long time. I still believe traditional notation is important and it would be great if everyone learned how to ‘read’ music, as it is such a big part of our lives, but a lyric sheet with chords also has some distinct advantages:
- If you already know a melody, there’s really no point of having it notated if it is already in your brain.
- Lyric/chord sheets are easy to create/edit in a simple word processor or even on a sheet of paper, allowing you to make quick changes to reflect your interpretation of the song.
- May eliminate page turns.
- Simplifying the bare bones ‘lead sheet’ (that has a melody notated in addition to lyrics and chords) may help facilitate memorization for singers who are accompanying themselves (like myself).
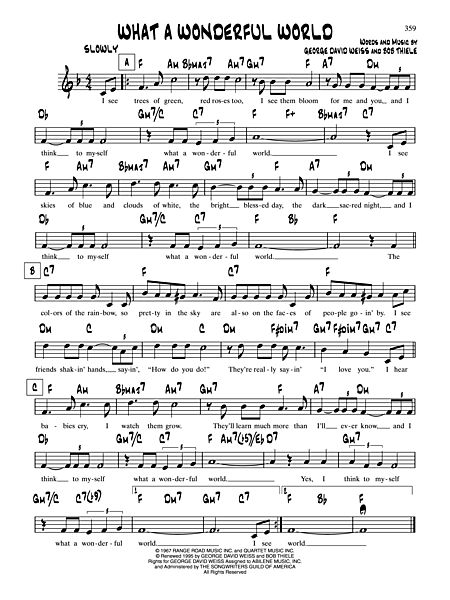 On this last point, take a moment to look at a traditional lead sheet of What a Wonderful World from Sheet Music Plus. There are THREE lines of information here:
- The lyrics
- The melody above the lyrics
- The chords above the melody
This is awesome if you don’t know the song, because you can learn a basic sketch of it from this information. However, it is lousy at forming a mental picture of the song in your mind because you’re trying to deal with 3 separate lines of info (trying to read left/right and up/down at the same time). By getting rid of the melody (which hopefully, we already know) and condensing the chords and lyrics of the song to a single line, we make it easier to memorize the chord patterns in the song. For example, as you look at the first lines of each of the verses of this song, the chord pattern and the one place it deviates (an A7* before the third verse) become really obvious and easy to commit to memory:
What A Wonderful World
By George David Weiss and Bob Thiele
I see [D]trees of [F#m]green, [G]red roses [F#m]too
[Em7] I see them [D]bloom for [F#7]me and for [Bm7]you
And I [Bb]think to myself [Em7] what a [A7]wonderful [D]world [Bm7] [Gmaj7] [A7]
I see [D]skies of [F#m]blue and [G]clouds of [F#m]white
[Em7] The bright blessed [D]day, and the [F#7]dark sacred [Bm7]night
And I [Bb]think to myself [Em7] what a [A7]wonderful [D]world [G] [G] [D]
The [A7]colors of the rainbow so [D]pretty in the sky
Are [A7]also on the faces of [D]people going by
I see [Bm7]friends shaking [F#m]hands saying [Bm7]how do you [F#m]do
[Em7]They’re really [F#dim7]saying [Em7]I [F#dim7]love [Em7]you
[A7]I hear [D]babies [F#m]cry, [G] I watch them [F#m]grow
[Em7] They’ll learn much [D]more than [F#7]I’ll ever [Bm7]know
And I [Bb]think to myself [Em7] what a [A7]wonderful [D]world [Fdim 2020] [B7]
Yes I [Em7]think to myself [A7] what a [C#dim7]wonderful [D]world [G6] [Gm6] [D]
In this version, I was also able to quickly fix errors the original transcriber made in both lyrics and chords, change the key, substitute some jazzier chords, and note that an Fdim (without a 7) is fingered 2020 on the ukulele fretboard.
That said, traditional lead sheets and full scores still play an important role in musical learning, so don’t throw the baby out with the bathwater. 🙂
*Of course, another way of looking at the A7 is that it really belongs to the end of the bridge section, in which case it should be moved to the end of ‘I love you’ in the previous line. If you think of it this way, all three first lines of the verses have an identical pattern.
Learning Chords: Song by Song Vs. Step by Step
A new post on my Power Up Ukulele site that talks about the benefits of Song by Song and Step by Step learning: http://powerup.ukuleleplay.com/chords-step-by-step-vs-song-by-song-approach/
Analysing a Jawaiian Strum
A student asked me to help with the strum in the body of this cover of Earth Angel:
I’ll admit I used a little known YouTube feature to help me figure out what he was doing; I slowed the video down to half speed and discovered . . . He’s combining left hand muting with chnking in a Jawaiian-style (a mixture of Hawaiian and reggae). It is really advanced, but you can conquer most anything if you break it down, go slowly and have the patience to go over it a thousand times. Here is what he is doing most of the time (with small variations throughout):
ϴ– X– ϴ– –– | ϴ– Xx ΠΦ –– (notice NOTHING is happening on beat four)
where . . .
ϴ = staccato downstroke muted quickly by lifting the left hand or with a ‘pinky mute’
X = chnk (percussive downstroke muted with rh)
x = left hand dead strum or pinky mute
Π = downstroke with index, middle or both
Φ = staccato upstroke muted quickly with right hand (or by lifting the left in case of a barre chord or by ‘pinky mute’) – in this case, either of the latter two options is used
You can simplify this by using Θ (Θ = staccato downstroke muted quickly with rh) in place of ϴ and using the right hand mute option with Φ, but it will sound subtly (or not so subtly) different, depending on many factors.
Find out more about strumming shorthand at <a href=”http://powerup.ukuleleplay.com/strumming/key-strum-shorthand/” target=”_blank”>http://powerup.ukuleleplay.com/strumming/key-strum-shorthand/</a>
256 Basic Strum Patterns!
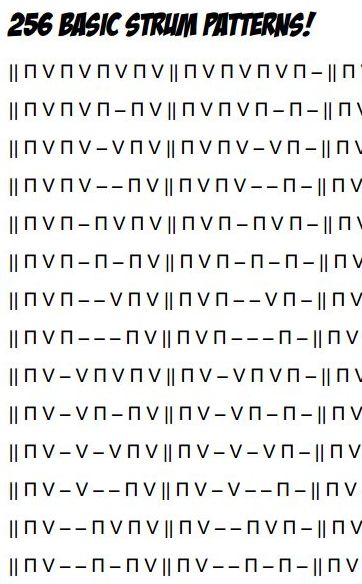 As I was working on the Level 1 Strumming section of the Power Up Ukulele site/syllabus, I got curious as to how many combinations of basic ‘down up’ strums are possible in a measure of 4/4. How useful some of these strums may or may not be is up to you to decide, but I’ve already seen a couple that might warrant a closer look.
To get my number of 256, I limited the possibilities by removing thumb strums and assuming that upstrums will happen only on the ‘and’ or second half of a beat. That leaves us with Π V, Π –, – V & – – as possible beats (dashes represent periods where there’s silence or we’re letting the ukulele ring). I entered these into a ‘permutation calculator’ and had it generate the results. Enjoy!
|| Π V Π V Π V Π V ||
|| Π V Π V Π V Π – ||
|| Π V Π V Π V – V ||
|| Π V Π V Π V – – ||
|| Π V Π V Π – Π V || Π V Π V Π – Π – || Π V Π V Π – – V || Π V Π V Π – – – ||
|| Π V Π V – V Π V || Π V Π V – V Π – || Π V Π V – V – V || Π V Π V – V – – ||
|| Π V Π V – – Π V || Π V Π V – – Π – || Π V Π V – – – V || Π V Π V – – – – ||
|| Π V Π – Π V Π V || Π V Π – Π V Π – || Π V Π – Π V – V || Π V Π – Π V – – ||
|| Π V Π – Π – Π V || Π V Π – Π – Π – || Π V Π – Π – – V || Π V Π – Π – – – ||
|| Π V Π – – V Π V || Π V Π – – V Π – || Π V Π – – V – V || Π V Π – – V – – ||
|| Π V Π – – – Π V || Π V Π – – – Π – || Π V Π – – – – V || Π V Π – – – – – ||
|| Π V – V Π V Π V || Π V – V Π V Π – || Π V – V Π V – V || Π V – V Π V – – ||
|| Π V – V Π – Π V || Π V – V Π – Π – || Π V – V Π – – V || Π V – V Π – – – ||
|| Π V – V – V Π V || Π V – V – V Π – || Π V – V – V – V || Π V – V – V – – ||
|| Π V – V – – Π V || Π V – V – – Π – || Π V – V – – – V || Π V – V – – – – ||
|| Π V – – Π V Π V || Π V – – Π V Π – || Π V – – Π V – V || Π V – – Π V – – ||
|| Π V – – Π – Π V || Π V – – Π – Π – || Π V – – Π – – V || Π V – – Π – – – ||
|| Π V – – – V Π V || Π V – – – V Π – || Π V – – – V – V || Π V – – – V – – ||
|| Π V – – – – Π V || Π V – – – – Π – || Π V – – – – – V || Π V – – – – – – ||
|| Π – Π V Π V Π V || Π – Π V Π V Π – || Π – Π V Π V – V || Π – Π V Π V – – ||
|| Π – Π V Π – Π V || Π – Π V Π – Π – || Π – Π V Π – – V || Π – Π V Π – – – ||
|| Π – Π V – V Π V || Π – Π V – V Π – || Π – Π V – V – V || Π – Π V – V – – ||
|| Π – Π V – – Π V || Π – Π V – – Π – || Π – Π V – – – V || Π – Π V – – – – ||
|| Π – Π – Π V Π V || Π – Π – Π V Π – || Π – Π – Π V – V || Π – Π – Π V – – ||
|| Π – Π – Π – Π V || Π – Π – Π – Π – || Π – Π – Π – – V || Π – Π – Π – – – ||
|| Π – Π – – V Π V || Π – Π – – V Π – || Π – Π – – V – V || Π – Π – – V – – ||
|| Π – Π – – – Π V || Π – Π – – – Π – || Π – Π – – – – V || Π – Π – – – – –||
|| Π – – V Π V Π V || Π – – V Π V Π – || Π – – V Π V – V || Π – – V Π V – – ||
|| Π – – V Π – Π V || Π – – V Π – Π – || Π – – V Π – – V || Π – – V Π – – – ||
|| Π – – V – V Π V || Π – – V – V Π – || Π – – V – V – V || Π – – V – V – – ||
|| Π – – V – – Π V || Π – – V – – Π – || Π – – V – – – V || Π – – V – – – – ||
|| Π – – – Π V Π V || Π – – – Π V Π – || Π – – – Π V – V || Π – – – Π V – – ||
|| Π – – – Π – Π V || Π – – – Π – Π – || Π – – – Π – – V || Π – – – Π – – – ||
|| Π – – – – V Π V || Π – – – – V Π – || Π – – – – V – V || Π – – – – V – – ||
|| Π – – – – – Π V || Π – – – – – Π – || Π – – – – – – V || Π – – – – – – – ||
|| – V Π V Π V Π V || – V Π V Π V Π – || – V Π V Π V – V || – V Π V Π V – – ||
|| – V Π V Π – Π V || – V Π V Π – Π – || – V Π V Π – – V || – V Π V Π – – – ||
|| – V Π V – V Π V || – V Π V – V Π – || – V Π V – V – V || – V Π V – V – – ||
|| – V Π V – – Π V || – V Π V – – Π – || – V Π V – – – V || – V Π V – – – – ||
|| – V Π – Π V Π V || – V Π – Π V Π – || – V Π – Π V – V || – V Π – Π V – – ||
|| – V Π – Π – Π V || – V Π – Π – Π – || – V Π – Π – – V || – V Π – Π – – – ||
|| – V Π – – V Π V || – V Π – – V Π – || – V Π – – V – V || – V Π – – V – – ||
|| – V Π – – – Π V || – V Π – – – Π – || – V Π – – – – V || – V Π – – – – – ||
|| – V – V Π V Π V || – V – V Π V Π – || – V – V Π V – V || – V – V Π V – – ||
|| – V – V Π – Π V || – V – V Π – Π – || – V – V Π – – V || – V – V Π – – – ||
|| – V – V – V Π V || – V – V – V Π – || – V – V – V – V || – V – V – V – – ||
|| – V – V – – Π V || – V – V – – Π – || – V – V – – – V || – V – V – – – – ||
|| – V – – Π V Π V || – V – – Π V Π – || – V – – Π V – V || – V – – Π V – – ||
|| – V – – Π – Π V || – V – – Π – Π – || – V – – Π – – V || – V – – Π – – – ||
|| – V – – – V Π V || – V – – – V Π – || – V – – – V – V || – V – – – V – – ||
|| – V – – – – Π V || – V – – – – Π – || – V – – – – – V || – V – – – – – – ||
|| – – Π V Π V Π V || – – Π V Π V Π – || – – Π V Π V – V || – – Π V Π V – – ||
|| – – Π V Π – Π V || – – Π V Π – Π – || – – Π V Π – – V || – – Π V Π – – – ||
|| – – Π V – V Π V || – – Π V – V Π – || – – Π V – V – V || – – Π V – V – – ||
|| – – Π V – – Π V || – – Π V – – Π – || – – Π V – – – V || – – Π V – – – – ||
|| – – Π – Π V Π V || – – Π – Π V Π – || – – Π – Π V – V || – – Π – Π V – – ||
|| – – Π – Π – Π V || – – Π – Π – Π – || – – Π – Π – – V || – – Π – Π – – – ||
|| – – Π – – V Π V || – – Π – – V Π – || – – Π – – V – V || – – Π – – V – – ||
|| – – Π – – – Π V || – – Π – – – Π – || – – Π – – – – V || – – Π – – – – – ||
|| – – – V Π V Π V || – – – V Π V Π – || – – – V Π V – V || – – – V Π V – – ||
|| – – – V Π – Π V || – – – V Π – Π – || – – – V Π – – V || – – – V Π – – – ||
|| – – – V – V Π V || – – – V – V Π – || – – – V – V – V || – – – V – V – – ||
|| – – – V – – Π V || – – – V – – Π – || – – – V – – – V || – – – V – – – – ||
|| – – – – Π V Π V || – – – – Π V Π – || – – – – Π V – V || – – – – Π V – – ||
|| – – – – Π – Π V || – – – – Π – Π – || – – – – Π – – V || – – – – Π – – – ||
|| – – – – – V Π V || – – – – – V Π – || – – – – – V – V || – – – – – V – – ||
|| – – – – – – Π V || – – – – – – Π – || – – – – – – – V || – – – – – – – – ||
HI*Sessions : Learning from the Best
I often suggest to my students that they watch the great uke players as well as listen to them. You can learn a lot just by watching. One of the great places to do this is HI*Sessions, a youtube channel that occasionally features some of the greatest ukulele players of our day, all in up-close-and-personal hi-def. Here are the episodes featuring some of my favorite players (you can skip the intros with the little navigation arrows at the bottom of the player) . . .
Kalei Gamiao
James Hill
Aldrine
Herb Ohta Jr.
Brittni
Taimane
Ukulele Tuning Tip for New Strings
Tuning an ukulele for the first time, you might wonder, “What is wrong with this instrument? It just won’t stay in tune.” Some conclude that, “The tuners must be slipping,” but if you have geared tuners, this is usually not the case. It is natural for new strings stretch out for the first few weeks of use until they ‘settle in’ and stay in tune for more than a few minutes.
However, if you’d like to break your new strings in a little faster, I suggest that the first time you tune them that you tune them to Canadian tuning: ADF#B (reference notes on ukehunt), a whole step higher than standard GCEA. What then? Walk away from your ukulele for a few hours (or a day) . . .
When you come back to your uke, it will be much easier to tune to GCEA and stay there for a longer period of time. Tuning the first time to Canadian tuning will not likely hurt your uke either, as thousands of Canadians tune it that way every day.
When you tune GCEA, the easiest way is with an electronic tuner, but here is a video reference to tune to if you need it:
Beyond D DU UDU : Favorite ‘Go-To’ Strums from 5 Ukulele Bloggers
Everyone seems to know the unofficial international ukulele strum, D DU UDU, but there is so much more you can do with the right hand. 5 ukulele bloggers weigh-in on their favorite ‘go to’ strums . . .
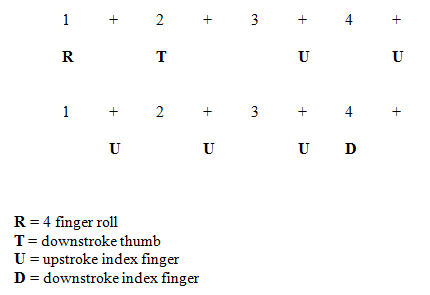
Modified Clawhammer Strum
One of my favorite strums goes like this:
- Thumb plucks “c” string.
- Down strum all four strings.
- Index finger pluck “a” string.
- Thumb plucks “g” string.
- Down strum all four strings.
A variation of this pattern (and a song tutorial) can be found here:
http://circuitsandstrings.wordpress.com/2013/01/18/lafayette-lilt-tutorial/
~Daniel Hulbert of circuitsandstrings.wordpress.com
Daniel will be teaching at this years Utah Uke Fest.
SKA Patterns
This video will (hopefully) supply you the foundation you need to start jamming with some ska tunes.
Before I had a family and a real job, I spent my days touring with a couple different ska bands. For some reason this genre of music, with it’s happy upbeats and carefree attitude has always appealed to me and the style transfers quite well to the ukulele. I guess that it makes sense…the ukulele originates from a sunny island (Hawaii) and ska music comes from a similar, albeit different island (Jamaica).
This style of music is all about timing – your strumming hand and fretting hand really have to be in sync and know what each other is doing. Like riding a bicycle, it might be frustrating and seem impossible at first, but with enough patience it will eventually click.
~Miles Ramsay of UKEonomics.com
The ‘Easy’ Split Stroke
This video demonstrates a simplified version of the split stroke with the song, The Old Ark’s a Moverin’ that I teach in my Level 2 ukulele classes:
This ‘easier’ version of Split Stroke splits 2 ‘triplet strums’ and a down-up evenly across 4 beats to create a syncopated, driving foundation for singing. Here’s two ways to look at it:
- Dt uD tu Du
- Dtu Dtu Du
D = accented down strum with the index finger
t = strumming down with the fleshy part of the thumb
u = up strum with the fleshy part of the index finger
If you’re just getting started with split/syncopated rhythms, take it slowly at first and work your speed up little by little.
~M. Ryan Taylor of UkulelePlay.com
Bossa Nova Strumming
Chords:

Tuning: G C E A ( high G ), Beat: 4/4, Tempo: 118 bpm
Strumming Pattern:
This is one way to play Bossa Nova style on your ukulele:
- First learn the strumming pattern ( 2 bars long ).
- In the beginning mute the strings with the left hand as shown in the the video.
- Mind the change from downbeat ( downstroke ) to offbeat ( upstroke ). This is called Partido Alto and brings some Latin touch in the strumming.
- Start with one chord and then add the others.
- Mute the strings between the strokes with your left hand.
~FriendlyFred of uke4u.com
Vaudeville and Variety-Style Strumming
I tend to play jazz and pop from the first four decades of the 20th Century, music that calls for strums that provide the ability to create syncopated rhythmic combinations, including triplets, 16th notes and 32nd notes.
The four strums I use most often are known as the “fan stroke”, the “triple”, the “double-time”, and the “split stroke” – as George Formby called it – or “syncopated stroke” – as Roy Smeck referred to it. All four are used liberally in this video of the 1931 tune “Lady of Spain”, which has forever been associated with the accordion.
I play the verse and refrain through twice using a combination of fingerpicking and various strokes and rolls, including flamenco-style finger rolls in refrain at 0:15, 1:15 and 1:24.
Then, at 1:32, I pick up the pace and run through the refrain using two strokes primarily: the triple and the double-time.
Let’s start with the simplest: the double-time. This is just a “down-up” every beat. It’s useful for creating a double-time feel if you increase speed and play it “down-up – down-up” every beat.
Now, the triple. This is often mistakenly referred to as a “triplet” stroke. It is and it isn’t. The triple stroke is actually a quarter-note triplet followed by an additional quarter note downstroke – “da-da-da – daa”. This is achieved by doing a downstroke across all four strings with the index, followed by a downstroke with the thumb, followed by an upstroke with the index and thumb together, followed by a downstroke with the index and thumb together – “down-down-up – down”.
I use the fan stroke several times in this arrangement. At 1:56 and again at 3:11, I play the classic triplet fan stroke. Its made up of three strokes – a downstroke with the nails of the pinky and ring finger, followed by a downstroke with the pad of the thumb, followed by an upstroke with the nail of the thumb. The effect is a straightforward “da-da-da”. You can see that I break my wrist when I do it, moving my hand in a circular fashion. On the downstroke with the pinky and ring fingers, the hand fans out – hence the name of the stroke. This stroke can be immediately and infinitely repeated, with the effect of an almost infinite triplet.
Finally – there’s the split stroke – I play a version of the refrain based on the split stroke starting at 2:28. It was the hardest of the above strokes to learn and – unfortunately – it’s the hardest for me to explain. The basic stroke is accomplished with the thumb and forefinger held together as for a basic downstroke strum. The stroke is “down-up-Down, down-up–Down, down-up” and the rhythm is two eighth notes followed by two syncopated triplets. The name “split” comes from the fact that on the initial downstoke, you only hit the botton two strings of the uke; then on the upstroke, you only this the op two strings of the uke. Then, on the third downstroke, you strike all four strings. This approach gives you the right accents. You hit the accents on the full four-string downstrokes of the figure, so the effect is “ba-da-DA, ba-da-DA, ba-da”. I learned how to play this stroke from watching videos made by fellow George Formby Society members Matt Richards http://www.youtube.com/watch?v=qhjy9_3rusc Peter C. Nixon and Mike Warren http://www.youtube.com/watch?v=t8cnPP3SU5s . I also highly recommend their tutorials of the additional Formby strokes – the Fan, the Triple, and the Shake, which I am still struggling with.
Those four strokes are “go-to” for me, with the Triple and Double being most commonly used to drive the tempo, but the fan and split stroke are often used in the way that a tenor banjo player might use a tremolo – as a means of holding a note or injecting interest in a solo or accompaniment.
~ John Bianchi of theukaholic.blogspot.com
Thanks to all the guest bloggers for sharing some awesome info!!!